The easies adapter to use is ArrayAdapter. All we need to do is wrap around a Java array or java.util.List instance. Then, we have a fully functional adapter:
android.R.layout.simple_list_item_1 simply turns those strings into TextView objects. And those TextView widgets, in turn, will be shown in the list, spinner, etc.
ListView is a ViewGroup that creates a list of scrollable items. The list items are automatically inserted to the list using a ListAdapter, and we use attached listener via setOnItemSelectedListener() to find out when the selection has changed.
But, if our activity is dominated by a single list, we might consider creating our activity as a subclass of ListActivity, rather than the regular Activity class. If main view is just the list, we do not even need to supply a layout; ListActivity will construct a full-screen list for us. If we want to customize the layout, ListActivity knows which widget is the main list for the activity as long as we identify our ListView as @android:id/list.
Now, let's work on real list example.
We'll create a scrollable list of country names that are read from a string array. We make the class extend ListActivity instead of Activity. ListActivity is an activity that displays a list of items by binding to a data source such as an array or Cursor, and exposes event handlers when the user selects an item. ListActivity hosts a ListView object that can be bound to different data sources, typically either an array or a Cursor holding query results.
Notice that we don't need to load a layout because we're using the whole screen for our list. ListActivity has a default layout that consists of a single, full-screen list in the center of the screen.
We call setListAdapter() which automatically adds a ListView to the ListActivity, and provide it with an ArrayAdapter that binds a simple_list_item_1 layout item to each entry in the WORLDCUP2010 array.
The ListAdapter manages a ListView backed by an array of arbitrary objects. By default this class expects that the provided resource id references a single TextView.
Android provides some standard row layout resources. These are in the R.layout class, and have names such as simple_list_item_1, simple_list_item_2, and two_line_list_item.
The setTextFilterEnabled(boolean) method turns on text filtering for the ListView, so that when the user begins typing, the list will be filtered.
Here is a little bit different version showing selection. The setOnItemClickListener(OnItemClickListener) method defines the on-click listener for each item. When an item in the ListView is clicked, the onItemClick() method is called and a Toast message is displayed, using the text from the clicked item.
A toast is a view containing a quick little message for the user. The toast class helps you create and show those. When the view is shown to the user, appears as a floating view over the application. It will never receive focus. The user will probably be in the middle of typing something else. The idea is to be as unobtrusive as possible, while still showing the user the information you want them to see. Two examples are the volume control, and the brief message saying that your settings have been saved.
The following ListView displays the selection at the top
If we modify onCreate() method of the previous example, we can get multiple choice list.
Modify the line:
Of course, we can do single choice, too.
Change
Here is the layout file, main.xml:
So we need to add element inside the element. Open the strings.xml file in res/values/ put the following into the file:
Here is another example code for spinner.
Java code is:
We implement the callbacks required by OnItemSelectedListener to adjust the selection label based on user input.
Layout file:
Run it, then we will get almost the same results.
Here is another version for AutoCompleteViewText.
We can give AutoCompleteTextView an adapter containing the list of candidate values via setAdapter(). Because the user could type something that is not in the list, however, it does not support selection listeners. Instead, we can register TextWatcher, as we can with any EditText widget, to be notified when the text changes. These events will occur either because of typing or from a selection from the drop-down list.
Java code is:
With layout file:
A GridView displays items in a two-dimensional, scrolling grid. We have moderate control over the number and size of the columns and the number of rows is dynamically determined based on the number of items. The items are acquired from a ListAdapter.
Following properties determine the number of columns and their sizes:
Another class, ImageAdapter.java
First we take care of some required methods inherited from BaseAdapter. The constructor and getCount() are self-explanatory. Normally, getItem() should return the actual object at the specified position in our Adapter, but for our case, we're not going to bother. Likewise, getItemId() should return the row id of the item, but right now we don't care.
However, getView() is the method we care about. This one creates a new View for each image that we put in our ImageAdapter. So we're going to create an ImageView each time. When this is called, we're going to receive a View, which is likely a recycled View object (at least after the first call), so we check for this, if it's null, we initialize the ImageView and setup all the properties we want.
Here is another example of GridView.
Java code:
With layout:
With Added images to res/drawable/ directory, we get the result as below.
Here is the Java code:
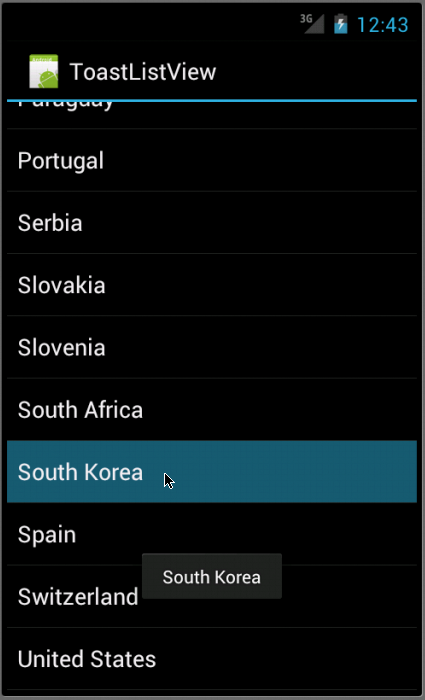
The onItemClick() callback method receives the AdapterView where the click occurred, the specific View that received the click, the position of the View clicked (zero-based), and the row id of the item clicked (if applicable). All that we care about is the position, so that we can pop up a Toast message that tells us the index position of the item clicked. We do this with Toast.makeText().show().
First, there are a few member variables, including an array of IDs that reference the images we placed in our drawable resources directory.
Next is the constructor, where we define the member Context. The rest of the constructor sets up a reference for our Gallery them, which adds the nice framing for each Gallery item. Once we have our mGalleryItemBackground, it's important to recycle the StyledAttribute for later re-use.
Layout file:
Almost everything is done by our layout file, main.xml:
We put the images into /res/drawable:
and the label for each image is stored in /res/values/strings.xml:

Files used in section ImageView example, ImageViewA.zip
So, as we can see from the layout file, main.xml, this example uses <ImageSwitcher> and <Gallery> as component of its View.
In the overridden method makeView(), we set the attributes of the ImageView that would be shown within the ImageSwitcher such as its background, its scale, and its layout parameters.
We then set an Adapter, after we got the Gallery View, then we call ImageAdapter for the Gallery which is a new class that we'll create next.
The onItemSelected() callback method receives the AdapterView where the selection occurred, the specific Image that received the click, the position of the Image clicked (zero-based), and the id of the item clicked (if applicable).
At the click of a gallery image, we would want to pass the selected image to the ImageSwitcher :

Files used in section ImageView example, ImageSwitcherA.zip
String[] arr = {"My", "first", "Android", "list"};
new ArrayAdapter<String>
      (this,android.R.layout.simple_list_item_1, arr);
The ArrayAdapter constructor takes following three parameters:- The Context to use, typically, this will be our activity instance.
- The resource ID of a view to use, for example, built in resource ID.
- The actual array or list.
android.R.layout.simple_list_item_1 simply turns those strings into TextView objects. And those TextView widgets, in turn, will be shown in the list, spinner, etc.
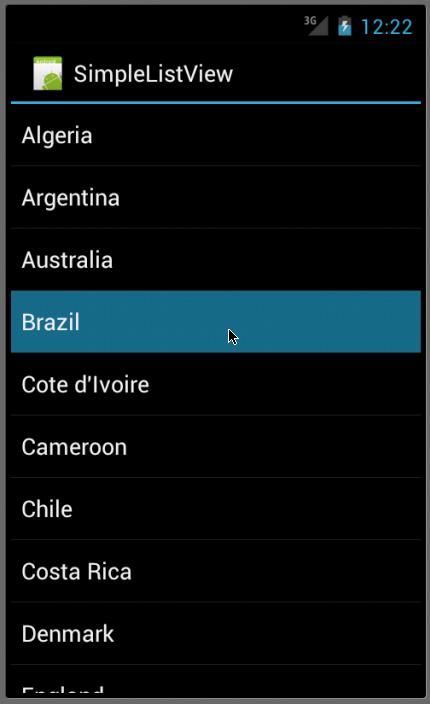
6.1 ListView
Displaying lists is a very common. The user gets a list of items that
can be scrolled. Then, the user select one item. Android provides the
view ListView for this.ListView is a ViewGroup that creates a list of scrollable items. The list items are automatically inserted to the list using a ListAdapter, and we use attached listener via setOnItemSelectedListener() to find out when the selection has changed.
But, if our activity is dominated by a single list, we might consider creating our activity as a subclass of ListActivity, rather than the regular Activity class. If main view is just the list, we do not even need to supply a layout; ListActivity will construct a full-screen list for us. If we want to customize the layout, ListActivity knows which widget is the main list for the activity as long as we identify our ListView as @android:id/list.
Now, let's work on real list example.
We'll create a scrollable list of country names that are read from a string array. We make the class extend ListActivity instead of Activity. ListActivity is an activity that displays a list of items by binding to a data source such as an array or Cursor, and exposes event handlers when the user selects an item. ListActivity hosts a ListView object that can be bound to different data sources, typically either an array or a Cursor holding query results.
Notice that we don't need to load a layout because we're using the whole screen for our list. ListActivity has a default layout that consists of a single, full-screen list in the center of the screen.
We call setListAdapter() which automatically adds a ListView to the ListActivity, and provide it with an ArrayAdapter that binds a simple_list_item_1 layout item to each entry in the WORLDCUP2010 array.
The ListAdapter manages a ListView backed by an array of arbitrary objects. By default this class expects that the provided resource id references a single TextView.
Android provides some standard row layout resources. These are in the R.layout class, and have names such as simple_list_item_1, simple_list_item_2, and two_line_list_item.
The setTextFilterEnabled(boolean) method turns on text filtering for the ListView, so that when the user begins typing, the list will be filtered.
package com.bogotobogo.SimpleListView;

import android.app.ListActivity;
import android.os.Bundle;
import android.widget.ArrayAdapter;

public class SimpleListViewActivity extends ListActivity {
    /** Called when the activity is first created. */
 @Override
 public void onCreate(Bundle savedInstanceState) {
  super.onCreate(savedInstanceState);
  setListAdapter(new ArrayAdapter<String>(this,
   android.R.layout.simple_list_item_1, WORLDCUP2010));
  getListView().setTextFilterEnabled(true);
 }

 static final String[] WORLDCUP2010 = new String[] {
  "Algeria",  "Argentina", "Australia",
  "Brazil", "Cote d'Ivoire", "Cameroon",
  "Chile", "Costa Rica", "Denmark",
  "England", "France", "Germany",
  "Ghana",  "Greece", "Honduras",
  "Italy",  "Japan", "Netherlands",
  "New Zealand", "Nigeria", "North Korea",
  "Paraguay", "Portugal","Serbia",
  "Slovakia", "Slovenia", "South Africa",
  "South Korea",  "Spain", "Switzerland",
  "United States", "Uruguay" };
}
Here is a little bit different version showing selection. The setOnItemClickListener(OnItemClickListener) method defines the on-click listener for each item. When an item in the ListView is clicked, the onItemClick() method is called and a Toast message is displayed, using the text from the clicked item.
A toast is a view containing a quick little message for the user. The toast class helps you create and show those. When the view is shown to the user, appears as a floating view over the application. It will never receive focus. The user will probably be in the middle of typing something else. The idea is to be as unobtrusive as possible, while still showing the user the information you want them to see. Two examples are the volume control, and the brief message saying that your settings have been saved.
package com.bogotobogo.ToastListView;

import android.app.ListActivity;
import android.os.Bundle;
import android.view.View;
import android.widget.AdapterView;
import android.widget.ArrayAdapter;
import android.widget.ListView;
import android.widget.TextView;
import android.widget.Toast;
import android.widget.AdapterView.OnItemClickListener;

 public class ToastListViewActivity extends ListActivity {
     /** Called when the activity is first created. */
  @Override
  public void onCreate(Bundle savedInstanceState) {
   super.onCreate(savedInstanceState);
   setListAdapter(new ArrayAdapter<String>(this,
     android.R.layout.simple_list_item_1, WORLDCUP2010));
   ListView lv = getListView();
   lv.setTextFilterEnabled(true);
   lv.setOnItemClickListener(new OnItemClickListener() {
    public void onItemClick(AdapterView<?> parent, View v,
      int position, long id) {
          // When clicked, show a toast with the TextView text
     Toast.makeText(getApplicationContext(), ((TextView) v).getText(),
     Toast.LENGTH_SHORT).show();
    }
   });
  }

  static final String[] WORLDCUP2010 = new String[] {
   "Algeria",  "Argentina", "Australia",
   "Brazil", "Cote d'Ivoire", "Cameroon",
   "Chile", "Costa Rica", "Denmark",
   "England", "France", "Germany",
   "Ghana",  "Greece", "Honduras",
   "Italy",  "Japan", "Netherlands",
   "New Zealand", "Nigeria", "North Korea",
   "Paraguay", "Portugal","Serbia",
   "Slovakia", "Slovenia", "South Africa",
   "South Korea",  "Spain", "Switzerland",
   "United States", "Uruguay" };
 }
And with the user defined layout file:<?xml version="1.0" encoding="utf-8"?>
<LinearLayout xmlns:android="http://schemas.android.com/apk/res/android"
android:layout_width="fill_parent"
android:layout_height="fill_parent"
android:orientation="vertical" >
<TextView
android:layout_width="fill_parent"
android:layout_height="wrap_content"
android:padding="10dp"
android:textSize="16sp" />
</LinearLayout>
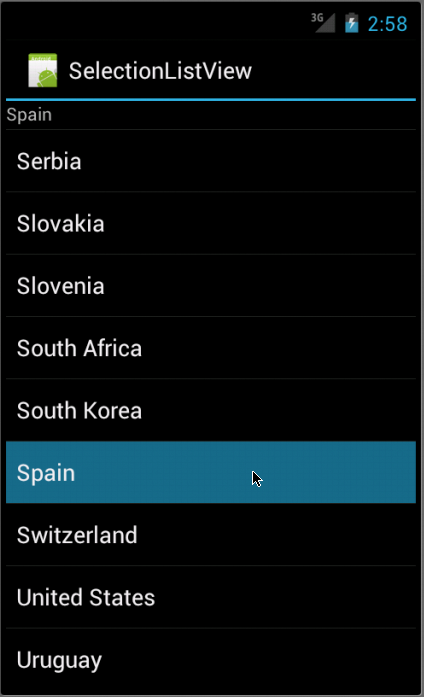
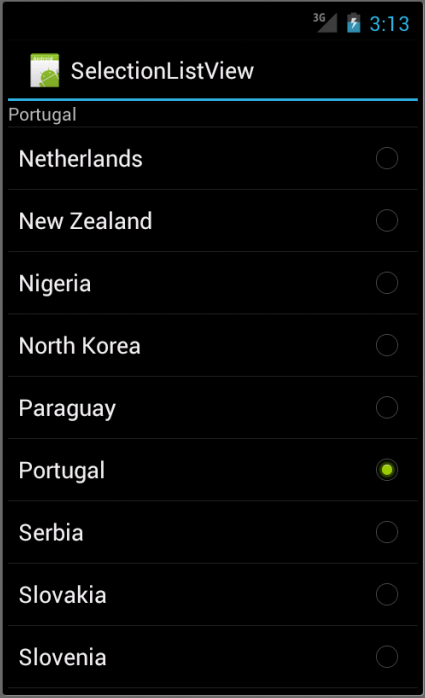
The following ListView displays the selection at the top
package com.bogotobogo.SelectionListView;

import android.os.Bundle;
import android.app.ListActivity;
import android.view.View;
import android.widget.ArrayAdapter;
import android.widget.ListView;
import android.widget.TextView;

public class SelectionListViewActivity extends ListActivity {
 TextView selection;
    /** Called when the activity is first created. */
 @Override
 public void onCreate(Bundle icicle) {
  super.onCreate(icicle);
  setContentView(R.layout.main);
  setListAdapter(new ArrayAdapter<String>(this,
    android.R.layout.simple_list_item_1,
     WORLDCUP2010));
  selection=(TextView)findViewById(R.id.selection);
 }

 public void onListItemClick(ListView parent, View v,
   int position,long id) {
   selection.setText(WORLDCUP2010[position]);
 }

 static final String[] WORLDCUP2010 = new String[] {
  "Algeria",  "Argentina", "Australia",
  "Brazil", "Cote d'Ivoire", "Cameroon",
  "Chile", "Costa Rica", "Denmark",
  "England", "France", "Germany",
  "Ghana",  "Greece", "Honduras",
  "Italy",  "Japan", "Netherlands",
  "New Zealand", "Nigeria", "North Korea",
  "Paraguay", "Portugal","Serbia",
  "Slovakia", "Slovenia", "South Africa",
  "South Korea",  "Spain", "Switzerland",
  "United States", "Uruguay" };
}
The main.xml:<?xml version="1.0" encoding="utf-8"?>
<LinearLayout xmlns:android="http://schemas.android.com/apk/res/android"
android:layout_width="fill_parent"
android:layout_height="fill_parent"
android:orientation="vertical" >
<TextView android:id="@+id/selection"
android:layout_width="fill_parent"
android:layout_height="wrap_content" />
<ListView android:id="@android:id/list"
android:layout_width="fill_parent"
android:layout_height="wrap_content"
android:drawSelectorOnTop="false" />
</LinearLayout>
and the strings.xml:<?xml version="1.0" encoding="utf-8"?>
<resources>
<string name="hello">Hello World, SelectionListViewActivity!</string>
<string name="app_name">SelectionListView</string>
</resources>
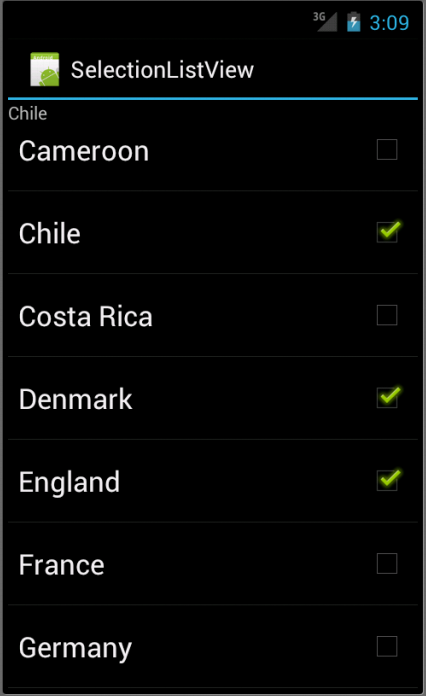
If we modify onCreate() method of the previous example, we can get multiple choice list.
Modify the line:
        setListAdapter(new ArrayAdapter<String>(this,
   android.R.layout.simple_list_item_1,
    WORLDCUP2010));
To:
 setListAdapter(new ArrayAdapter<String>(this,
  android.R.layout.simple_list_item_multiple_choice,
  WORLDCUP2010));
And add the following three linse at the end of the method:
 final ListView listView = getListView();
 listView.setItemsCanFocus(false);
 listView.setChoiceMode(ListView.CHOICE_MODE_MULTIPLE);
The new method onCreate() is:
@Override
public void onCreate(Bundle icicle) {
 super.onCreate(icicle);
 setContentView(R.layout.main);
 setListAdapter(new ArrayAdapter<String>(this,
  android.R.layout.simple_list_item_multiple_choice,
  WORLDCUP2010));
 selection=(TextView)findViewById(R.id.selection);
 final ListView listView = getListView();
 listView.setItemsCanFocus(false);
 listView.setChoiceMode(ListView.CHOICE_MODE_MULTIPLE);
}
We converted the previous single choice list to multiple choice list. Of course, we can do single choice, too.
Change
android.R.layout.simple_list_item_multiple_choice,
->
android.R.layout.simple_list_item_single_choice,
and
listView.setChoiceMode(ListView.CHOICE_MODE_MULTIPLE);
->
listView.setChoiceMode(ListView.CHOICE_MODE_SINGLE);
Then, we get:
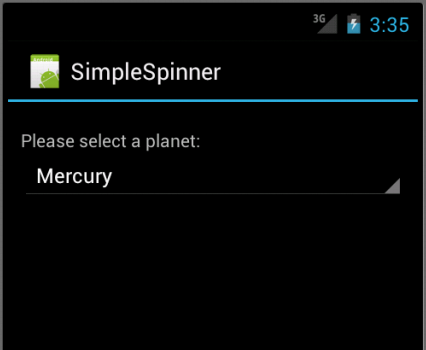
6.2 Spinner
A Spinner is a widget that allows the user to select an item from a group. It displays one child at a time and lets the user pick
among them. The items in the Spinner come from the Adapter associated
with this view. It is similar to a dropdown list and will allow
scrolling when the list exceeds the available vertical space on the
screen.Here is the layout file, main.xml:
<?xml version="1.0" encoding="utf-8"?>
<LinearLayout xmlns:android="http://schemas.android.com/apk/res/android"
 android:orientation="vertical"
 android:padding="10dip"
 android:layout_width="fill_parent"
 android:layout_height="wrap_content">

 <TextView android:id="@+id/select"
  android:layout_width="fill_parent"
  android:layout_height="wrap_content"
  android:layout_marginTop="10dip"
  android:text="@string/select" />

 <Spinner
  android:id="@+id/spinner"
  android:layout_width="fill_parent"
  android:layout_height="wrap_content"
  android:drawSelectorOnTop="true"
  android:prompt="@string/planet_prompt"/>

</LinearLayout>
Because the Spinner's android:prompt is a string resource and Android does not allow it to be a string, it must be a reference to a resource.
So we need to add element inside the element. Open the strings.xml file in res/values/ put the following into the file:
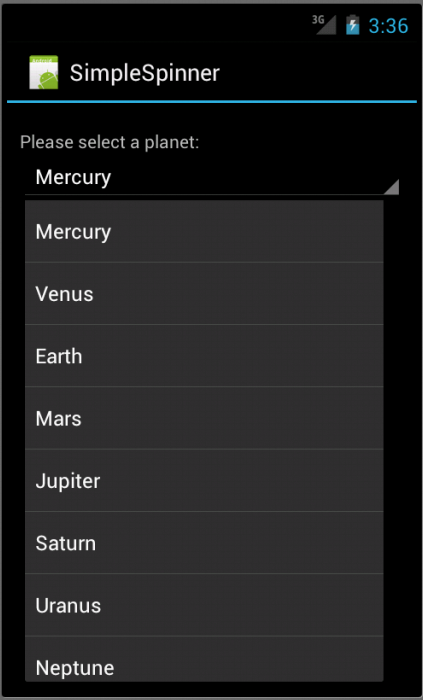
<string name="planet_prompt">Choose a planet</string>Then, create a new XML file in res/values/ called arrays.xml. Insert the following list of planet items that the user can select from in the Spinner widget.
<resources>
 <string-array name="planets">
  <item>Mercury</item>
  <item>Venus</item>
  <item>Earth</item>
  <item>Mars</item>
  <item>Jupiter</item>
  <item>Saturn</item>
  <item>Uranus</item>
  <item>Neptune</item>
 </string-array>
</resources>
with strings.xml:
<?xml version="1>0" encoding="utf-8"?>
<resources>

    <string name="hello">Hello World, SimpleSpinnerActivity!</string>
    <string name="app_name">SimpleSpinner</string>
    <string name="planet_prompt">Choose a planet</string>
    <string name="select">Please select a planet:</string>

</resources>
And our Java code: SimpleSpinner.javapackage com.bogotobogo.SimpleSpinner;
import android.app.Activity;
import android.os.Bundle;
import android.widget.ArrayAdapter;
import android.widget.Spinner;
public class SimpleSpinnerActivity extends Activity {
/** Called when the activity is first created. */
@Override
public void onCreate(Bundle savedInstanceState) {
super.onCreate(savedInstanceState);
setContentView(R.layout.main);
Spinner s = (Spinner) findViewById(R.id.spinner);
ArrayAdapter adapter = ArrayAdapter.createFromResource(
 this, R.array.planets, android.R.layout.simple_spinner_item);
adapter.setDropDownViewResource(android.R.layout.simple_spinner_dropdown_item);
s.setAdapter(adapter);
}
}
We start by creating a Spinner from our layout. Spinner s = (Spinner) findViewById(R.id.spinner);Recall we defined id in main.xml as:
android:id="@+id/spinner"We then create an ArrayAdapter that binds each element of our string array to a layout view, we pass createFromResource our Context, the array of selectable items and the type of layout we'd like each one bound to.
ArrayAdapter adapter = ArrayAdapter.createFromResource( this, R.array.planets, android.R.layout.simple_spinner_item);We then call setDropDownViewResource() to define the type of layout in which to present the entire collection.
adapter.setDropDownViewResource(android.R.layout.simple_spinner_dropdown_item);Finally, we set this Adapter to associate with our Spinner, so the string items have a place to go.
s.setAdapter(adapter);If we run it, we should get something like this:
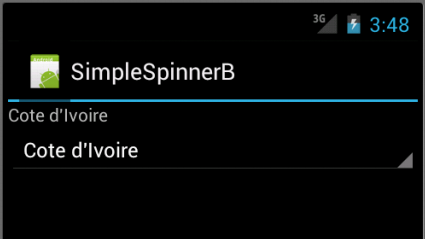
Here is another example code for spinner.
Java code is:
package com.bogotobogo.SimpleSpinnerB;

import android.app.Activity;
import android.os.Bundle;
import android.view.View;
import android.widget.AdapterView;
import android.widget.ArrayAdapter;
import android.widget.Spinner;
import android.widget.TextView;

public class SimpleSpinnerBActivity extends Activity
 implements AdapterView.OnItemSelectedListener {
 TextView selection;
    /** Called when the activity is first created. */
 @Override
 public void onCreate(Bundle icicle) {
  super.onCreate(icicle);
  setContentView(R.layout.main);
  selection=(TextView)findViewById(R.id.selection);

  Spinner spin=(Spinner)findViewById(R.id.spinner);
  spin.setOnItemSelectedListener(this);

  ArrayAdapter<String> adapter=new ArrayAdapter<String>(this,
   android.R.layout.simple_spinner_item, WORLDCUP2010);
  adapter.setDropDownViewResource(
   android.R.layout.simple_spinner_dropdown_item);
  spin.setAdapter(adapter);
 }

 public void onItemSelected(AdapterView<?> parent,
      View v, int position, long id) {
  selection.setText(WORLDCUP2010[position]);
 }

 public void onNothingSelected(AdapterView<?> parent) {
  selection.setText("");
 }

 static final String[] WORLDCUP2010 = new String[] {
  "Algeria",  "Argentina", "Australia",
  "Brazil", "Cote d'Ivoire", "Cameroon",
  "Chile", "Costa Rica", "Denmark",
  "England", "France", "Germany",
  "Ghana",  "Greece", "Honduras",
  "Italy",  "Japan", "Netherlands",
  "New Zealand", "Nigeria", "North Korea",
  "Paraguay", "Portugal","Serbia",
  "Slovakia", "Slovenia", "South Africa",
  "South Korea",  "Spain", "Switzerland",
  "United States", "Uruguay" };
}
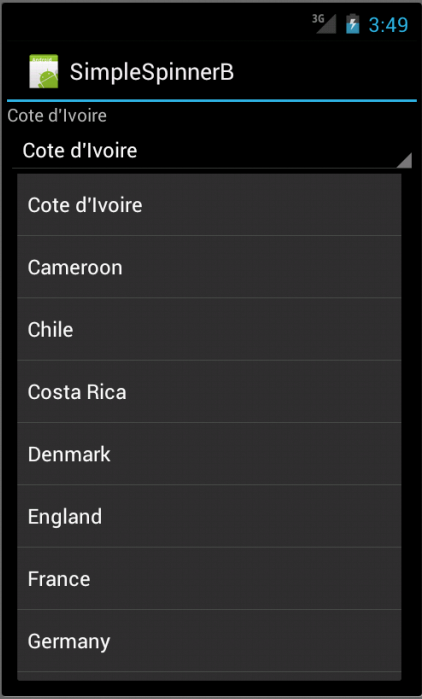
Here, we attach the activity itself as the selection listener.spin.setOnItemSelectedListener(this);This works because the activity implements the OnItemSelectedListener. We configure the adapter the adapter not only with the list but also with a specific resource to use for the drop-down view via adapter.setDropDownViewResource(). Notice the use of android.R.layout.simple_spinner_item as the built-in View for showing items in the spinner itself.
We implement the callbacks required by OnItemSelectedListener to adjust the selection label based on user input.
Layout file:
<?xml version="1.0" encoding="utf-8"?>
<LinearLayout
 xmlns:android="http://schemas.android.com/apk/res/android"
 android:orientation="vertical"
 android:layout_width="fill_parent"
 android:layout_height="fill_parent" >
 <TextView
  android:id="@+id/selection"
  android:layout_width="fill_parent"
  android:layout_height="wrap_content" />
 <Spinner android:id="@+id/spinner"
  android:layout_width="fill_parent"
  android:layout_height="wrap_content"
  android:drawSelectorOnTop="true" />
</LinearLayout>
The Spinner property android:drawSelectorOnTop controls whether the arrow is drawn on the selector button on the right side of the Spinner UI.
Run it, then we will get almost the same results.
6.3 AutocompleteTextView
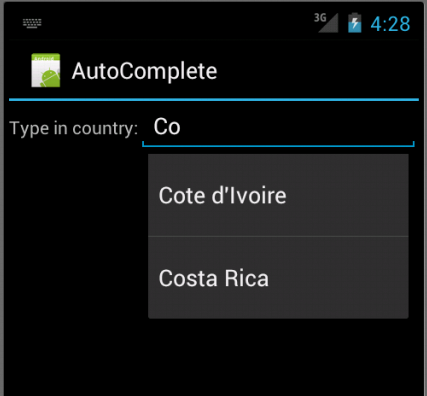
AutoCompleteTextView is an implementation of the EditText widget that will provide auto-complete suggestions as the user types. The suggestions are extracted from a collection of strings.package com.bogotobogo.AutoComplete;
import android.app.Activity;
import android.os.Bundle;
import android.widget.ArrayAdapter;
import android.widget.AutoCompleteTextView;
public class AutoCompleteActivity extends Activity {
/** Called when the activity is first created. */
@Override
protected void onCreate(Bundle savedInstanceState) {
super.onCreate(savedInstanceState);
setContentView(R.layout.main);
AutoCompleteTextView textView = (AutoCompleteTextView) findViewById(R.id.edit);
ArrayAdapter<String> adapter = new ArrayAdapter<String>(this,
android.R.layout.simple_dropdown_item_1line, WORLDCUP2010);
textView.setAdapter(adapter);
}
static final String[] WORLDCUP2010 = new String[] {
"Algeria", "Argentina", "Australia",
"Brazil", "Cote d'Ivoire", "Cameroon",
"Chile", "Costa Rica", "Denmark",
"England", "France", "Germany",
"Ghana", "Greece", "Honduras",
"Italy", "Japan", "Netherlands",
"New Zealand", "Nigeria", "North Korea",
"Paraguay", "Portugal","Serbia",
"Slovakia", "Slovenia", "South Africa",
"South Korea", "Spain", "Switzerland",
"United States", "Uruguay" };
}
Here, we create an AutoCompleteTextView from our layout. We then create an ArrayAdapter that binds a simple_dropdown_item_1line layout item to each entry in the WORLDCUP2010 array (which we'll add next). setListAdapter(new ArrayAdapter(this, android.R.layout.simple_list_item_1, WORLDCUP2010));The last part sets the ArrayAdapter to associate with our AutoCompleteTextView.
textView.setAdapter(adapter);If we run it with following layout:
<?xml version="1.0" encoding="utf-8"?>
<LinearLayout xmlns:android="http://schemas.android.com/apk/res/android"
 android:orientation="horizontal"
 android:layout_width="fill_parent"
 android:layout_height="wrap_content">

 <TextView android:id="@+id/country"
  android:layout_width="wrap_content"
  android:layout_height="wrap_content"
  android:text="@string/country" />

 <AutoCompleteTextView android:id="@+id/edit"
  android:layout_width="fill_parent"
  android:layout_height="wrap_content"/>

</LinearLayout>
with strings.xml:
<?xml version="1.0" encoding="utf-8"?>
<resources>

    <string name="hello">Hello World, AutoCompleteActivity!</string>
    <string name="app_name">AutoComplete</string>
    <string name="country">Type in country: </string>

</resources>
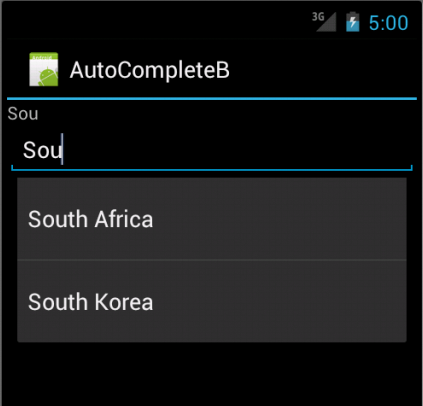
we get the result as in the picture below. Here is another version for AutoCompleteViewText.
We can give AutoCompleteTextView an adapter containing the list of candidate values via setAdapter(). Because the user could type something that is not in the list, however, it does not support selection listeners. Instead, we can register TextWatcher, as we can with any EditText widget, to be notified when the text changes. These events will occur either because of typing or from a selection from the drop-down list.
Java code is:
package com.bogotobogo.AutoCompleteB;

import android.app.Activity;
import android.os.Bundle;
import android.text.Editable;
import android.text.TextWatcher;
import android.widget.ArrayAdapter;
import android.widget.AutoCompleteTextView;
import android.widget.TextView;

public class AutoCompleteBActivity extends Activity
 implements TextWatcher {
  TextView selection;
  AutoCompleteTextView edit;
    /** Called when the activity is first created. */
 @Override
 public void onCreate(Bundle icicle) {
  super.onCreate(icicle);
  setContentView(R.layout.main);
  selection=(TextView)findViewById(R.id.selection);
  edit=(AutoCompleteTextView)findViewById(R.id.edit);
  edit.addTextChangedListener(this);

  edit.setAdapter(new ArrayAdapter<String>(this,
    android.R.layout.simple_dropdown_item_1line,
         WORLDCUP2010));
 }

 public void onTextChanged(CharSequence s, int start, int before,
    int count) {
  selection.setText(edit.getText());
 }

 public void beforeTextChanged(CharSequence s, int start,
    int count, int after) {
  // needed for interface, but not used
 }

 public void afterTextChanged(Editable s) {
  // needed for interface, but not used
 }
 static final String[] WORLDCUP2010 = new String[] {
  "Algeria",  "Argentina", "Australia",
  "Brazil", "Cote d'Ivoire", "Cameroon",
  "Chile", "Costa Rica", "Denmark",
  "England", "France", "Germany",
  "Ghana",  "Greece", "Honduras",
  "Italy",  "Japan", "Netherlands",
  "New Zealand", "Nigeria", "North Korea",
  "Paraguay", "Portugal","Serbia",
  "Slovakia", "Slovenia", "South Africa",
  "South Korea",  "Spain", "Switzerland",
  "United States", "Uruguay" };
}
This time, our activity implements TextWatcher, which means our callbacks are onTextChanged() and we update the selection label to match the AutoCompleteTextView's current contents.With layout file:
<?xml version="1.0" encoding="utf-8"?>
<LinearLayout
 xmlns:android="http://schemas.android.com/apk/res/android"
 android:orientation="vertical"
 android:layout_width="fill_parent"
 android:layout_height="fill_parent">
 <TextView
  android:id="@+id/selection"
  android:layout_width="fill_parent"
  android:layout_height="wrap_content" />
 <AutoCompleteTextView android:id="@+id/edit"
   android:layout_width="fill_parent"
   android:layout_height="wrap_content"
   android:completionThreshold="3"/>
</LinearLayout>
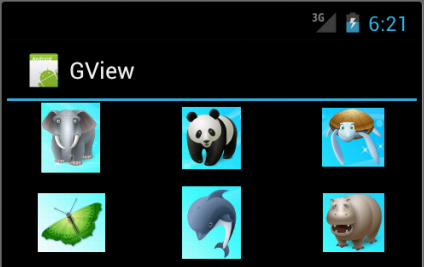
A GridView displays items in a two-dimensional, scrolling grid. We have moderate control over the number and size of the columns and the number of rows is dynamically determined based on the number of items. The items are acquired from a ListAdapter.
Following properties determine the number of columns and their sizes:
- android:numColumns
Specifies how many columns there are, of if we supply a value of auto_fit, Android will compute the number of columns based on the available space and the following properties. - android:verticalSpacing and android:horizontalSpacing
Indicate how much whitespace there should be between items in the grid. - android:columnWidth
Indicates how many pixel wide each column should be. - android:stretchMode
Indicates, for grids with auto_fit for android:numColumns, what should happen for any available space not taken up by columns or spacing. This can be columnWidth, to have the columns taken up available space, or spacingWidth, to have the whitespace between columns absorb extra space.
<?xml version="1.0" encoding="utf-8"?>
<GridView xmlns:android=
 "http://schemas.android.com/apk/res/android"
 android:id="@+id/gridview"
 android:layout_width="fill_parent"
 android:layout_height="fill_parent"
 android:numColumns="auto_fit"
 android:verticalSpacing="10dp"
 android:horizontalSpacing="10dp"
 android:columnWidth="90dp"
 android:stretchMode="columnWidth"
 android:gravity="center"
/>
Java code, GView.java:
package com.bogotobogo.GView;

import com.bogotobogo.GView.ImageAdapter;
import com.bogotobogo.GView.R;

import android.app.Activity;
import android.os.Bundle;
import android.widget.GridView;

public class GViewActivity extends Activity {
    @Override
    /** Called when the activity is first created. */
 public void onCreate(Bundle savedInstanceState) {
  super.onCreate(savedInstanceState);
  setContentView(R.layout.main);

  GridView gridview = (GridView) findViewById(R.id.gridview);
  gridview.setAdapter(new ImageAdapter(this));
 }
}
Another class, ImageAdapter.java
package com.bogotobogo.GView;

import android.content.Context;
import android.view.View;
import android.view.ViewGroup;
import android.widget.BaseAdapter;
import android.widget.GridView;
import android.widget.ImageView;

public class ImageAdapter extends BaseAdapter {
 private Context mContext;

 public ImageAdapter(Context c) {
  mContext = c;
 }

 public int getCount() {
  return mThumbIds.length;
 }

 public Object getItem(int position) {
  return null;
 }

 public long getItemId(int position) {
  return 0;
 }

 // create a new ImageView for each item referenced by the Adapter
 public View getView(int position, View convertView, ViewGroup parent) {
  ImageView imageView;
  if (convertView == null) { // if it's not recycled, initialize some attributes
   imageView = new ImageView(mContext);
   imageView.setLayoutParams(new GridView.LayoutParams(85, 85));
   imageView.setScaleType(ImageView.ScaleType.CENTER_CROP);
   imageView.setPadding(8, 8, 8, 8);
  } else {
   imageView = (ImageView) convertView;
  }

  imageView.setImageResource(mThumbIds[position]);
  return imageView;
 }

 // references to our images
 private Integer[] mThumbIds = {
   R.drawable.aaa, R.drawable.bbb,
   R.drawable.ccc, R.drawable.ddd,
   R.drawable.eee, R.drawable.fff
 };
}
Image files: drawables.zip.First we take care of some required methods inherited from BaseAdapter. The constructor and getCount() are self-explanatory. Normally, getItem() should return the actual object at the specified position in our Adapter, but for our case, we're not going to bother. Likewise, getItemId() should return the row id of the item, but right now we don't care.
However, getView() is the method we care about. This one creates a new View for each image that we put in our ImageAdapter. So we're going to create an ImageView each time. When this is called, we're going to receive a View, which is likely a recycled View object (at least after the first call), so we check for this, if it's null, we initialize the ImageView and setup all the properties we want.
 if (convertView == null) { // if it's not recycled, initialize some attributes
 imageView = new ImageView(mContext);
The LayoutParams() initialization sets the height and
width of the View,this ensures that no matter the drawable size, each
image is resized and cropped to fit in the ImageView (if necessary).
imageView.setLayoutParams(new GridView.LayoutParams(85, 85));With setScaleType(), we say that images should be cropped toward the center (if necessary).
imageView.setScaleType(ImageView.ScaleType.CENTER_CROP);And finally, we set the padding within the ImageView. (Note that, if the images have various aspect-ratios, as they do in our case, then less padding will cause for more cropping of the image, if it does not match the dimensions given to the ImageView.)
imageView.setPadding(8, 8, 8, 8);At the end of getView() we set the image resource and return the ImageView.
imageView.setImageResource(mThumbIds[position]);
Here is another example of GridView.
Java code:
package com.bogotobogo.GViewB;

import android.app.Activity;
import android.content.Context;
import android.os.Bundle;
import android.view.View;
import android.view.ViewGroup;
import android.widget.AdapterView;
import android.widget.ArrayAdapter;
import android.widget.GridView;
import android.widget.TextView;

public class GViewBActivity extends Activity
 implements AdapterView.OnItemSelectedListener {
  TextView selection;
    /** Called when the activity is first created. */
 @Override
 public void onCreate(Bundle icicle) {
  super.onCreate(icicle);
  setContentView(R.layout.main);
  selection=(TextView)findViewById(R.id.selection);

  GridView g=(GridView) findViewById(R.id.grid);
  g.setAdapter(new FunnyLookingAdapter(this,
     android.R.layout.simple_list_item_1,
     WORLDCUP2010));
  g.setOnItemSelectedListener(this);
 }

 public void onItemSelected(AdapterView<?> parent, View v,
     int position, long id) {
  selection.setText(WORLDCUP2010[position]);
 }

 public void onNothingSelected(AdapterView<?> parent) {
  selection.setText("");
 }

 private class FunnyLookingAdapter extends ArrayAdapter<String> {
  Context ctxt;

  FunnyLookingAdapter(Context ctxt, int resource,
     String[] WORLDCUP2010) {
   super(ctxt, resource, WORLDCUP2010);

   this.ctxt=ctxt;
  }

  public View getView(int position, View convertView,
     ViewGroup parent) {
   TextView label=(TextView)convertView;

   if (convertView==null) {
    convertView=new TextView(ctxt);
    label=(TextView)convertView;
   }

   label.setText(WORLDCUP2010[position]);

   return(convertView);
  }
 }

 static final String[] WORLDCUP2010 = new String[] {
  "Algeria",  "Argentina", "Australia",
  "Brazil", "Cote d'Ivoire", "Cameroon",
  "Chile", "Costa Rica", "Denmark",
  "England", "France", "Germany",
  "Ghana",  "Greece", "Honduras",
  "Italy",  "Japan", "Netherlands",
  "New Zealand", "Nigeria", "North Korea",
  "Paraguay", "Portugal","Serbia",
  "Slovakia", "Slovenia", "South Africa",
  "South Korea",  "Spain", "Switzerland",
  "United States", "Uruguay" };
}
For the grid cells, we create our own views, by subclassing ArrayAdapter and overriding getView(). In this case, we wrap the strings in our own TextView
widgets, just to be different. If getView() receives a TextView, we
just reset its text; otherwise, we create a new TextView instance and
populate it.With layout:
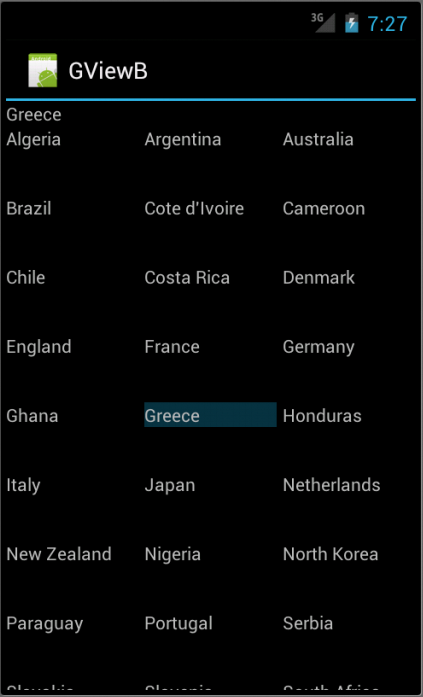
<?xml version="1.0" encoding="utf-8"?>
<LinearLayout
 xmlns:android="http://schemas.android.com/apk/res/android"
 android:orientation="vertical"
 android:layout_width="fill_parent"
 android:layout_height="fill_parent">
 <TextView
  android:id="@+id/selection"
  android:layout_width="fill_parent"
  android:layout_height="wrap_content"/>
 <GridView
  android:id="@+id/grid"
  android:layout_width="fill_parent"
  android:layout_height="fill_parent"
  android:verticalSpacing="35dp"
  android:horizontalSpacing="5dp"
  android:numColumns="auto_fit"
  android:columnWidth="100dp"
  android:stretchMode="columnWidth"
  android:gravity="center"/>
</LinearLayout>
For this grid, we take up the entire screen except for what our selection label requires. The number of columns is computed by Android, android:numColumns ="auto_fit", based on 5-pixel horizontal spacing and 100-pixel columns, with the columns absorbing any width left over, android:stretchMode = "columnWidth".
With Added images to res/drawable/ directory, we get the result as below.
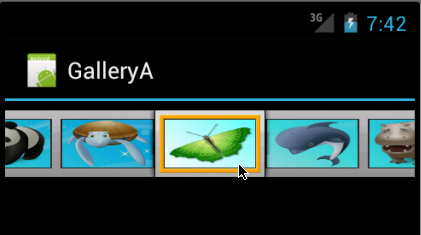
6.5 Gallery
A Gallery is a View commonly used to display items
in a horizontally scrolling list that locks the current selection at the
center. When one is selected, a message will be shown.Here is the Java code:
package com.bogotobogo.GalleryA;

import android.app.Activity;
import android.content.Context;
import android.content.res.TypedArray;
import android.os.Bundle;
import android.view.View;
import android.view.ViewGroup;
import android.widget.AdapterView;
import android.widget.BaseAdapter;
import android.widget.Gallery;
import android.widget.ImageView;
import android.widget.Toast;
import android.widget.AdapterView.OnItemClickListener;

public class GalleryAActivity extends Activity {
    /** Called when the activity is first created. */
 @Override
 public void onCreate(Bundle savedInstanceState) {
  super.onCreate(savedInstanceState);
  setContentView(R.layout.main);
  Gallery g = (Gallery) findViewById(R.id.gallery);
  g.setAdapter(new ImageAdapter(this));

  g.setOnItemClickListener(new OnItemClickListener() {
   public void onItemClick
                           (AdapterView<?> parent, View v, int position, long id) {
    Toast.makeText(GalleryAActivity.this, ""
                                 + position, Toast.LENGTH_SHORT).show();
   }
  });
 }

 public class ImageAdapter extends BaseAdapter {
  int mGalleryItemBackground;
  private Context mContext;

  private Integer[] mImageIds = {
   R.drawable.aaa,
   R.drawable.bbb,
   R.drawable.ccc,
   R.drawable.ddd,
   R.drawable.eee,
   R.drawable.fff
  };

  public ImageAdapter(Context c) {
   mContext = c;
   TypedArray a = c.obtainStyledAttributes(R.styleable.GalleryA);
   mGalleryItemBackground = a.getResourceId(
   R.styleable.GalleryA_android_galleryItemBackground, 0);
   a.recycle();
  }

  public int getCount() {
   return mImageIds.length;
  }

  public Object getItem(int position) {
   return position;
  }

  public long getItemId(int position) {
   return position;
  }

  public View getView(int position, View convertView, ViewGroup parent) {
   ImageView i = new ImageView(mContext);

   i.setImageResource(mImageIds[position]);
   i.setLayoutParams(new Gallery.LayoutParams(150, 100));
   i.setScaleType(ImageView.ScaleType.FIT_XY);
   i.setBackgroundResource(mGalleryItemBackground);

   return i;
  }
 }
}
We start as usual: set the layout and capture the View we want (our Gallery). setContentView(R.layout.main); Gallery g = (Gallery) findViewById(R.id.gallery);We then set an Adapter, called ImageAdapter for the Gallery which is a new class that we'll create next.
g.setAdapter(new ImageAdapter(this));Then we create an item click listener for the Gallery. This is like a normal on-click listener (which you might be familiar with for buttons), but it listens to each item that we've added to the Gallery.
The onItemClick() callback method receives the AdapterView where the click occurred, the specific View that received the click, the position of the View clicked (zero-based), and the row id of the item clicked (if applicable). All that we care about is the position, so that we can pop up a Toast message that tells us the index position of the item clicked. We do this with Toast.makeText().show().
 g.setOnItemClickListener(new OnItemClickListener() {
  public void onItemClick(AdapterView<?> parent,
                      View v, int position, long id) {
   Toast.makeText(GalleryAActivity.this, ""
                           + position, Toast.LENGTH_SHORT).show();
  }
 });
Let's look at the ImageAdapter class. First, there are a few member variables, including an array of IDs that reference the images we placed in our drawable resources directory.
Next is the constructor, where we define the member Context. The rest of the constructor sets up a reference for our Gallery them, which adds the nice framing for each Gallery item. Once we have our mGalleryItemBackground, it's important to recycle the StyledAttribute for later re-use.
public ImageAdapter(Context c) {
 mContext = c;
 TypedArray a = c.obtainStyledAttributes(R.styleable.GalleryA);
 mGalleryItemBackground =
            a.getResourceId(R.styleable.GalleryA_android_galleryItemBackground, 0);
 a.recycle();
}
The next three methods are required for basic member queries. But then we have the getView()
method, which is called for each item read by our ImageAdapter, when
the Gallery is being built. Here, we use our member Context to create a
new ImageView. We then define the image resource with
the current position of the Gallery items (corresponding to our array of
drawables), set the dimensions for the ImageView, set the image scaling
to fit the ImageView dimensions, then finally set the background theme
for the ImageView.Layout file:
<?xml version="1.0" encoding="utf-8"?>
<Gallery xmlns:android="http://schemas.android.com/apk/res/android"
 android:id="@+id/gallery"
 android:layout_width="fill_parent"
 android:layout_height="wrap_content"
/>
and with resource file in res/values/resource.xml to defines the styleable attribute as a resource of the app itself and gives it the necessary structure to work in the app.
<?xml version="1.0" encoding="utf-8"?>
<resources>
    <declare-styleable name="GalleryA">
        <attr name="android:galleryItemBackground" />
    </declare-styleable>
</resources>
If we run the application, we will get something like this:
6.6 ImageView
This ImageView example is really simple. Almost everything is done by our layout file, main.xml:
<?xml version="1.0" encoding="utf-8"?>
<ScrollView xmlns:android="http://schemas.android.com/apk/res/android"
    android:layout_width="fill_parent"
    android:layout_height="fill_parent">

    <LinearLayout
        android:layout_width="fill_parent"
        android:layout_height="wrap_content"
        android:orientation="vertical">

 <TextView
            android:layout_width="fill_parent"
            android:layout_height="wrap_content"
            android:paddingTop="10dip"
            android:text="@string/imageText1"/>
 <ImageView
     android:contentDescription="@string/imageText1"
            android:src="@drawable/everest1"
            android:adjustViewBounds="true"
            android:maxWidth="200dip"
            android:maxHeight="200dip"
            android:layout_width="wrap_content"
            android:layout_height="wrap_content" />

 <TextView
            android:layout_width="fill_parent"
            android:layout_height="wrap_content"
            android:paddingTop="10dip"
            android:text="@string/imageText2"/>
        <ImageView
            android:contentDescription="@string/imageText2"
            android:src="@drawable/everest2"
            android:adjustViewBounds="true"
            android:maxWidth="200dip"
            android:maxHeight="200dip"
            android:layout_width="wrap_content"
            android:layout_height="wrap_content" />

 <TextView
            android:layout_width="fill_parent"
            android:layout_height="wrap_content"
            android:paddingTop="10dip"
            android:text="@string/imageText3"/>
 <ImageView
     android:contentDescription="@string/imageText3"
            android:src="@drawable/everest3"
            android:adjustViewBounds="true"
            android:maxWidth="200dip"
            android:maxHeight="200dip"
            android:layout_width="wrap_content"
            android:layout_height="wrap_content" />

 <TextView
            android:layout_width="fill_parent"
            android:layout_height="wrap_content"
            android:paddingTop="10dip"
            android:text="@string/imageText4"/>
 <ImageView
     android:contentDescription="@string/imageText4"
            android:src="@drawable/everest4"
            android:adjustViewBounds="true"
            android:maxWidth="200dip"
            android:maxHeight="200dip"
            android:layout_width="wrap_content"
            android:layout_height="wrap_content" />

 <TextView
            android:layout_width="fill_parent"
            android:layout_height="wrap_content"
            android:paddingTop="10dip"
            android:text="@string/imageText5"/>
 <ImageView
     android:contentDescription="@string/imageText5"
            android:src="@drawable/everest5"
            android:adjustViewBounds="true"
            android:maxWidth="200dip"
            android:maxHeight="200dip"
            android:layout_width="wrap_content"
            android:layout_height="wrap_content" />
    </LinearLayout>
</ScrollView>
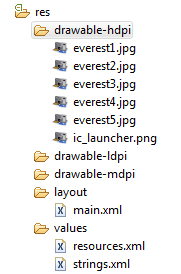
We put the <TextView> and <ImageView> within <LinearLayout> which is a child element of <ScrollView>. We put the images into /res/drawable:
and the label for each image is stored in /res/values/strings.xml:
<?xml version="1.0" encoding="utf-8"?>
<resources>

    <string name="hello">Hello World, ImageViewAActivity!</string>
    <string name="app_name">ImageViewA</string>

</resources>
and the /res/values/resources.xml:<?xml version="1.0" encoding="utf-8" ?> <resources> <string name="imageText1">Mt. Everest 1</string> <string name="imageText2">Mt. Everest 2</string> <string name="imageText3">Mt. Everest 3</string> <string name="imageText4">Mt. Everest 4</string> <string name="imageText5">Mt. Everest 5</string> </resources>Our java class just sets the View, ImageViewAActivity.java:
package com.bogotobogo.ImageViewA;

import android.app.Activity;
import android.os.Bundle;

public class ImageViewAActivity extends Activity {
    /** Called when the activity is first created. */
    @Override
    public void onCreate(Bundle savedInstanceState) {
        super.onCreate(savedInstanceState);
        setContentView(R.layout.main);
    }
}
Files used in section ImageView example, ImageViewA.zip
6.7 Image Switcher View
In this example, a gallery of images that scrolls at the bottom of
the screen landscape and upon selection of one image, it gets displayed
as a larger image in the upper part using an ImageSwitcher.
So, as we can see from the layout file, main.xml, this example uses <ImageSwitcher> and <Gallery> as component of its View.
<?xml version="1.0" encoding="utf-8"?>
<RelativeLayout xmlns:android="http://schemas.android.com/apk/res/android"
    android:layout_width="fill_parent"
    android:layout_height="fill_parent">
    <ImageSwitcher android:id="@+id/imgswitcher"
        android:layout_width="fill_parent"
        android:layout_height="fill_parent"
        android:layout_alignParentTop="true"
        android:layout_alignParentLeft="true"/>
    <Gallery android:id="@+id/gallery"
        android:background="#55000000"
        android:layout_width="fill_parent"
        android:layout_height="50dp"
        android:layout_alignParentBottom="true"
        android:layout_alignParentLeft="true"
        android:gravity="center_vertical"
        android:spacing="16dp"/>
</RelativeLayout>
Here, we're using "#aarrggbb" form as a background color for the Gallery. android:background="#55000000"Let's look at our java code, ImageSwitcherA.java:
package com.bogotobogo.ImageSwitcherA;

import android.app.Activity;
import android.content.Context;
import android.os.Bundle;
import android.view.View;
import android.view.ViewGroup;
import android.view.Window;
import android.view.animation.AnimationUtils;
import android.widget.AdapterView;
import android.widget.BaseAdapter;
import android.widget.Gallery;
import android.widget.Gallery.LayoutParams;
import android.widget.ImageSwitcher;
import android.widget.ImageView;
import android.widget.AdapterView.OnItemSelectedListener;
import android.widget.ViewSwitcher.ViewFactory;


public class ImageSwitcherAActivity extends Activity implements
           OnItemSelectedListener, ViewFactory {

    @Override
    public void onCreate(Bundle savedInstanceState) {
        super.onCreate(savedInstanceState);
        requestWindowFeature(Window.FEATURE_NO_TITLE);

        setContentView(R.layout.main);

        mSwitcher = (ImageSwitcher) findViewById(R.id.imgswitcher);
        mSwitcher.setFactory(this);
        mSwitcher.setInAnimation(AnimationUtils.loadAnimation(this,
                android.R.anim.fade_in));
        mSwitcher.setOutAnimation(AnimationUtils.loadAnimation(this,
                android.R.anim.fade_out));

        Gallery g = (Gallery) findViewById(R.id.gallery);
        g.setAdapter(new ImageAdapter(this));
        g.setOnItemSelectedListener(this);
    }

    public void onItemSelected(AdapterView<?> parent, View v, int position, long id) {
        mSwitcher.setImageResource(mImageIds[position]);
    }

    public void onNothingSelected(AdapterView<?> parent) {
    }

    @Override
    public View makeView() {
        ImageView i = new ImageView(this);
        i.setBackgroundColor(0xFF000000);
        i.setScaleType(ImageView.ScaleType.FIT_CENTER);
        i.setLayoutParams(new ImageSwitcher.LayoutParams(LayoutParams.FILL_PARENT,
                LayoutParams.FILL_PARENT));
        return i;
    }

    private ImageSwitcher mSwitcher;

    public class ImageAdapter extends BaseAdapter {
        public ImageAdapter(Context c) {
            mContext = c;
        }

        public int getCount() {
            return mThumbIds.length;
        }

        public Object getItem(int position) {
            return position;
        }

        public long getItemId(int position) {
            return position;
        }

        public View getView(int position, View convertView, ViewGroup parent) {
            ImageView i = new ImageView(mContext);

            i.setImageResource(mThumbIds[position]);
            i.setAdjustViewBounds(true);
            i.setLayoutParams(new Gallery.LayoutParams(
                    LayoutParams.WRAP_CONTENT, LayoutParams.WRAP_CONTENT));
            i.setBackgroundResource(R.drawable.picture_frame);
            return i;
        }

        private Context mContext;
    }

    private Integer[] mThumbIds = {
            R.drawable.thumb1, R.drawable.thumb2,
            R.drawable.thumb3, R.drawable.thumb4,
            R.drawable.thumb5, R.drawable.thumb6,
            R.drawable.thumb7, R.drawable.thumb8};

    private Integer[] mImageIds = {
            R.drawable.sample1, R.drawable.sample2,
            R.drawable.sample3, R.drawable.sample4,
            R.drawable.sample5, R.drawable.sample6,
            R.drawable.sample7, R.drawable.sample8};
}
Note that we create a class that not only extends Activity but also implements ViewFactory. The ViewFactory is a Interface that creates views that need to be shown in the ImageSwitcher.In the overridden method makeView(), we set the attributes of the ImageView that would be shown within the ImageSwitcher such as its background, its scale, and its layout parameters.
    @Override
    public View makeView() {
        ImageView i = new ImageView(this);
        i.setBackgroundColor(0xFF000000);
        i.setScaleType(ImageView.ScaleType.FIT_CENTER);
        i.setLayoutParams(new ImageSwitcher.LayoutParams(LayoutParams.FILL_PARENT,
                LayoutParams.FILL_PARENT));
        return i;
    }
In onCreate() method, we set the layout and capture the View we want (our ImageSwitcher). Then,
we set the factory used to create the two views between which the ImageSwitcher will flip. mSwitcher = (ImageSwitcher) findViewById(R.id.imgswitcher);
mSwitcher.setFactory(this);
The method setInAnimation() specifies the animation used to animate a View that enters the screen and setOutAnimation() specifies the animation used to animate a View that exit the screen.We then set an Adapter, after we got the Gallery View, then we call ImageAdapter for the Gallery which is a new class that we'll create next.
g.setAdapter(new ImageAdapter(this));Then we create an item selected listener for the Gallery. This is like a normal on-select listener (which you might be familiar with for buttons), but it listens to each item that we've added to the Gallery.
The onItemSelected() callback method receives the AdapterView where the selection occurred, the specific Image that received the click, the position of the Image clicked (zero-based), and the id of the item clicked (if applicable).
At the click of a gallery image, we would want to pass the selected image to the ImageSwitcher :
    public void onItemSelected(AdapterView<?> parent, View v, int position, long id) {
        mSwitcher.setImageResource(mImageIds[position]);
    }
Files used in section ImageView example, ImageSwitcherA.zip
No comments:
Post a Comment